Explore top 10 tips to secure your open-source projects now. Read More
×How to Read Linux Audit Logs During an Intrusion
3 - 5 min read
Topics Covered
When a security alert fires, the panic often sets in before the analysis. Many administrators instinctively reach for /var/log/auth.log or journalctl, but those logs tell only a partial story. They document successful logins and authentication attempts, but they rarely capture the granular "how" of a post-compromise environment.
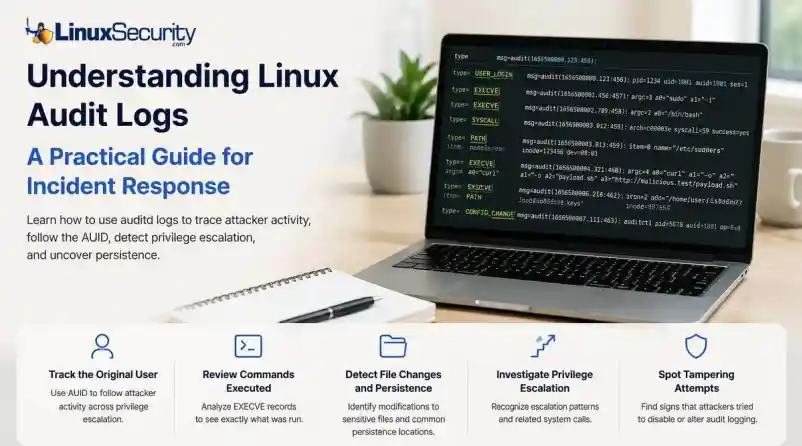
To truly reconstruct an attack, you need to master audit logs. Unlike standard authentication logs, Linux audit logs (managed by auditd) record system-level activity, including specific syscalls, file modifications, and command executions.
In this guide, we’ll move beyond administrative documentation to show you exactly how to reconstruct an attacker’s activity during a live investigation.
Quick Incident Response Checklist
- Define the scope: Identify the first suspicious timestamp.
- Find the entry point: Search for
USER_LOGINevents. - Anchor the AUID: Capture the original user ID to track activity post-escalation.
- Trace execution: Filter
EXECVEevents for theauid. - Audit persistence: Check for file modifications in
~/.ssh/authorized_keysorcron. - Detect tampering: Inspect
CONFIG_CHANGEevents. - Correlate: Match audit events with firewall and EDR logs.
What Linux Audit Logs Reveal (The Forensic Anatomy)
Before running commands, understand that auditd creates a chain of evidence. Every action (like running whoami) generates a syscall, and every syscall is tagged with an Event ID and an auid.
The auid (Audit User ID) is your "golden thread." Even if an attacker runs sudo su - to become root, their original auid remains the same. You aren't tracking a changing uid; you are tracking the session's source.
Step-by-Step: Reconstructing an Intrusion
Let’s walk through a standard attack: The Compromised Session.
Step A: Identify the Entry
Start by searching for the login event around your alert time:
Bash
ausearch -m USER_LOGIN -ts 2026-06-29:02:10 -iLook for: The auid field in the output. If the auid is 1001, every subsequent command you search for will use that specific ID.
Step B: Follow the Attacker (The AUID Trail)
Once you have the auid, you can ignore the uid (which will switch to 0 when they become root) and follow their specific trail:
Bash
ausearch -ua 1001 -iSample Output:
Plaintext
type=EXECVE msg=audit(1656500000.123:456): argc=3 a0="curl" a1="-o" a2="payload.sh" ...
This shows the attacker downloading a script. The auid links this activity directly to the 1001 session, even if they are currently acting as root.
Step C: Identify Sensitive File Changes
Attackers follow a pattern when establishing persistence or escalating. Use this table to prioritize what to investigate:
|
File |
Why Attackers Target It |
|
|
To create or alter accounts for permanent access. |
|
|
To crack password hashes or escalate privileges. |
|
|
To grant themselves permanent sudo privileges. |
|
|
To maintain persistence via SSH keys. |
To find these, use:
Bash
ausearch -f /etc/sudoers -iStep D: Investigate Privilege Escalation
You will often see related syscalls. When an attacker elevates privileges, look for the sequence:
execve: The execution ofsudoorpkexec.setuid: The transition of the effectiveuidto0.chmod/chown: Attempts to manipulate file permissions to ensure their "backdoor" remains accessible.
Correlation: The Key to Context
Audit logs are powerful, but they are not a standalone truth. To verify the "why," correlate them:
- Network Logs: If audit logs show a
curlto a suspicious IP, check your firewall logs to see if that connection was successful or blocked. - EDR Process Trees: Compare the
pidfrom your audit record to your EDR telemetry to see the full parent-child relationship of the processes. - FIM (File Integrity Monitoring): If you see a file access in the audit log, verify if your FIM tool flagged the file's hash as changed.
Common Investigation Mistakes
- Chasing the
uid: Never follow theuid. It resets when an attacker usessudo. Always stick to theauid. - Missing
CONFIG_CHANGE: Sophisticated attackers will runauditctl -e 0to disable logging. If you see a gap in your logs, searchausearch -m CONFIG_CHANGEto see if the logging service was tampered with. - Forgetting Timezones: Ensure your
ausearchtimestamps match your system's UTC or local time settings to avoid missing the window.
Final Thoughts
The next time an alert fires, don’t stop at the authentication logs. Audit logs can reveal every command an attacker executed, every sensitive file they touched, and every privilege escalation path they navigated. By shifting your focus from "did they log in?" to "what did they do after they logged in?", you transform audit logs from simple compliance records into a high-fidelity forensic trail.
Are you ready to harden your environment? Subscribe to the LinuxSecurity Newsletter for upcoming tutorials on writing custom audit.rules and building automated detection logic for your SIEM.
Related Reading
- Auditd vs eBPF: Effective Strategies for Modern Linux Monitoring
- Linux Logs Often Miss Critical Attack Details and Detection Gaps
- Understanding Log Management and Analysis Tools for Linux Systems
- Effective File Integrity Monitoring Techniques for Linux Systems
- Understanding Linux Persistence Mechanisms and Detection Tools
- Linux EDR: Essential Tool for Cybersecurity and Incident Response


Powered By

Linux Security - Your source for Top Linux News, Advisories, HOWTOs and Feature Releases
QUICK LINKS
subscribe to newsletters!
Like staying secure? So do we.
Sign up for updates, tips, and alerts!