Audit Linux privileges now to limit compromise, escalation, and system-wide damage. Review Linux Privileges×


How to Check Docker Container Isolation in Linux
 Jul 06, 2026
•
Jul 06, 2026
•
 MaK Ulac
4 - 7 min read

Topics Covered
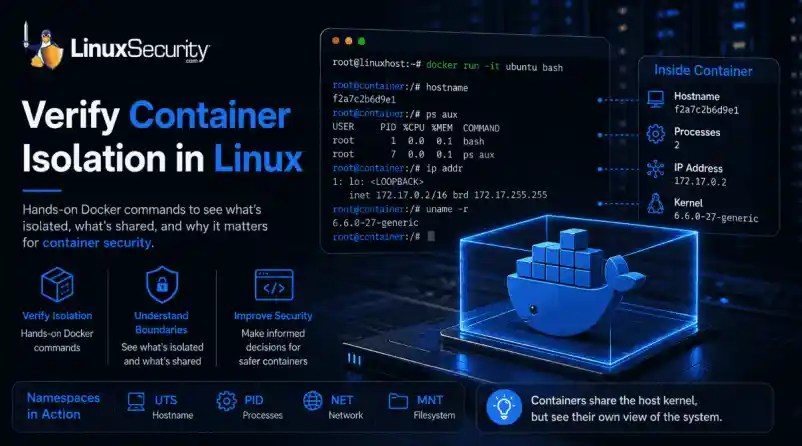
Docker makes containers feel like separate, lightweight virtual machines. They have their own hostnames, processes, and networking—but are they actually isolated? Many administrators assume they are without ever verifying the boundaries. If you’ve ever wondered what truly separates your application from the host, this guide is for you. We’ll use simple Docker commands to verify container isolation firsthand and uncover exactly what remains shared with the host.
What Is Container Isolation?
Think of container isolation as a way to trick a process into thinking it has a server all to itself. If you’ve worked with virtual machines, you’re used to a hypervisor handling the heavy lifting—effectively carving out a slice of hardware. Containers are different.  They don’t virtualize hardware; they use Linux namespaces to carve up the kernel’s view of the system. Basically, the kernel assigns labels to resources like network stacks or process lists. If a process in a container asks "What can I see?", the kernel only shows it the resources tagged with its specific namespace ID. It’s an illusion, sure, but it’s an incredibly effective one for keeping your applications from interfering with the host or each other.
What Is Container Security?
When people ask what container security is, they are usually looking for a way to keep their apps safe from start to finish. It’s not just one thing; it’s the whole process of managing your images, the runtime, and the host machine. The reason isolation is the biggest part of this is simple: if you don’t have a clear boundary, one bad script or one compromised app can easily reach into your host system. By knowing exactly what a container can (and can't) see, you can lock down your configuration and make sure that if one container fails, it doesn't take the whole server down with it.
Step 1: Launch a Test Container with Docker Run
To observe these boundaries, we’ll use the docker run command—the most common way to spin up a new container. We are using the official Ubuntu image because it provides a familiar Linux userspace that is ideal for testing Docker commands.
Run this command on your host:
docker run -it ubuntu bash- docker run: Creates and starts a new container instance.
- -it: Launches the container in interactive mode so you can run commands inside it.
Once the command finishes, your terminal prompt will change. You are now working inside the container’s isolated environment.
Step 2: Use Docker PS to Confirm the Container Is Running
Open a second terminal window on your host and run:
docker psThe output lists every active container, including its unique Container ID, image, uptime, and assigned name. Verify that your Ubuntu container appears in this list before moving to the next step.
Step 3: Compare Hostnames to See Basic Isolation
Let's see if the container truly has its own identity.
-
Inside the container: Run
hostname -
On your host: Run
hostname
You will see two different values. This is because the container uses the UTS (UNIX Timesharing System) namespace, which allows it to maintain a unique hostname independent of your machine.
Step 4: Compare Running Processes
Namespaces are at work here, too, preventing the container from seeing host-level processes.
-
Inside the container: Run
ps aux -
On your host: Run
ps aux
Inside the container, you will only see a small, clean list of processes, with bash as PID 1 because it is the first process started within that PID namespace. Meanwhile, your host terminal shows every system process. This PID namespace separation is vital for container isolation.
Step 5: Use Docker Exec to Access a Running Container
Administrators often need to debug a container that is already running in the background. For this, we use docker exec.
|
Feature |
docker run |
docker exec |
|
Purpose |
Creates a new container |
Uses an existing container |
|
State |
Starts a fresh environment |
Hooks into a running process |
|
Typical Use |
Initial testing/deployment |
Debugging or maintenance |
Run this on your host to jump back into your running container:
docker exec -it bash Step 6: Compare Network Settings
Run ip addr in both the container and the host. The container uses a separate network namespace, giving it its own virtual interfaces and a private IP address (usually in the 172.17.x.x range). This proves that the container has a private network stack, keeping its traffic separate from your host’s primary interfaces.
Step 7: Compare Filesystems
Create a file inside the container to test storage boundaries:
touch /testfile.txtIf you check your host’s current directory, you won't see this file. Although Docker stores the container's writable layer on the host, the file does not appear in your host's current working directory because the container has its own mount namespace.
Step 8: See What Containers Still Share
Finally, run this on both the host and the container:
uname -rYou will notice the kernel version is identical. This is the most critical lesson for container runtime security. Because containers share the host kernel, they do not provide the same "hard" security boundary as a virtual machine. According to official Linux kernel documentation, Linux namespaces provide logical partitioning, but they do not replace the need for secure kernel management.
Common Container Isolation Mistakes
- Assuming Containers Are Virtual Machines: Containers are not hardware-virtualized. They are processes on your host, meaning a kernel-level exploit could impact the entire system.
-
Running Privileged Containers: Using
--privilegedgrants a container access to host devices, effectively bypassing many security namespaces. -
Using Host Networking: Using
--net=hostshares the host’s network namespace, removing all network isolation. -
Mounting Sensitive Directories: Mapping
/etcor the Docker socket into a container can give the container full control over the host.
Quick Reference: Observed Namespaces
|
Namespace |
What You Verified |
|
UTS |
Different hostname |
|
PID |
Different process list |
|
Network |
Different interfaces and IP |
|
Mount |
Separate filesystem view |
Verify You've Observed Container Isolation
Before you finish, ensure you’ve confirmed the following:
- Different hostname
- Different process list
- Different network interface
- Same kernel version
- File created inside the container is not visible in your host's working directory
Container Security Best Practices
To maintain a hardened environment, follow these container security best practices based on the CIS Docker Benchmark:
- Use Least Privilege: Never run your applications as root inside a container.
- Avoid Privileged Containers: Only use elevated privileges when absolutely necessary for hardware access.
- Keep Images Updated: Rebuild containers regularly using current base images to receive security patches and bug fixes.
- Patch Host Kernels: Since all containers share the host kernel, keeping your host OS updated is your primary defense against exploits.
- Audit Mounts: Regularly review which directories are mounted into your containers to prevent unauthorized host access.
Final Takeaway
You’ve now verified that containers provide effective logical isolation, but they are not the "air-gapped" environments that virtual machines are. Understanding these boundaries allows you to make informed container security decisions.
Now that you’ve verified isolation firsthand, the next step is learning how Linux capabilities, cgroups, and seccomp further strengthen your environment. Exploring those features will help you move from basic container usage to building truly resilient and secure systems.
Want more Linux security news, vulnerability analysis, and software supply chain updates? Subscribe to the LinuxSecurity Newsletter and get the latest threats, advisories, and expert insights delivered directly to your inbox.
 PREVIOUS
 NEXT
NEXT

Powered By

Linux Security - Your source for Top Linux News, Advisories, HOWTOs and Feature Releases
QUICK LINKS
subscribe to newsletters!
Like staying secure? So do we.
Sign up for updates, tips, and alerts!