Explore top 10 tips to secure your open-source projects now. Read More
×How to Back Up Proxmox VMs on Linux: A Practical Guide
4 - 7 min read

Topics Covered
It is necessary to back up Proxmox virtual machines (VM) to avoid data loss in any scenario, including hardware failure, software issues, or human error. When disaster strikes, you can quickly restore the needed data and ensure business continuity. Read this post to learn how to back up Proxmox VMs on Linux.
Understanding Proxmox Backups
Proxmox Virtual Environment (VE) has a built-in feature for backing up virtual machines. Backups are an essential component of any disaster recovery plan. You can configure a Proxmox backup manually (on-demand) and or schedule automated backups.
How to Back Up a Virtual Machine in Proxmox VE
Let’s explain how to back up a virtual machine running Linux in Proxmox VE.
- Open the web interface of Proxmox VE.
- Select the virtual machine you want to back up and click Backup now. A VM running Debian Linux is selected in this example.


Back up a VM in the web interface of Proxmox VE
- Configure the following parameters:
- Storage: Select the storage that is configured to store Proxmox VM backups.
- Mode: Select the mode (Suspend, Snapshot or Stop) to define the VM behavior when creating a backup. If you don’t want to terminate the normal operation of the VM, you can select the Snapshot mode.
- Compression: Select a compression level (none, LZO, GZIP, or ZSTD).
- Notification mode: Select when to get notified about backup results.
You can also add notes (optional). Once done, click the Backup button to start a Proxmox VM backup job.

Configuring Proxmox VM backup options
Wait until a VM is backed up.
Storing and Managing Proxmox Backups on Linux
You can manage and configure data stores to store Proxmox backups. Follow the steps below to configure a datastore as backup storage:
- Go to Datacenter > Storage and select the datastore for backup storage. Click Edit.

Editing storage options
- In the Content drop-down list, select the VZDump backup file.
- Click OK to save changes.

Selecting the VZDump backup file
You can select a VM backup and change the protection level by clicking the Change Protection button. This option protects the backup against deletion in the Proxmox web interface, command-line interface, or API. Retention settings don’t impact protected backups. However, backup files can still be deleted from the file system in the Linux shell with root privileges.
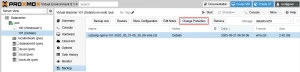
How to change protection for a VM backup
Proxmox Restore from Backup: Recovering a VM
To restore a Proxmox VM from backup, perform the following actions:
- Select your virtual machine in the navigation pane on the left side of the Proxmox VE web interface.
- Select the needed Proxmox VM backup and click Restore.

Restoring a Proxmox VM
- Select the storage where the VM backup is located. By default, the backup location from the VM configuration is selected. You can choose any data store that is configured to store virtual machines.
- Click Restore to proceed.

Selecting options to restore a VM
Automating Proxmox VM Backup and Recovery Tasks
You can automate Proxmox VM backups by configuring a schedule. This ensures that you always create a backup on time. Creating regular backups is crucial for data protection and disaster recovery.
- Go to Datacenter > Backup and click Add to add a new Proxmox backup schedule.

Adding a backup schedule
- Configure general schedule settings:
- Node: Select a Proxmox node and choose which VMs to back up.
- Storage: Select the datastore to store backups.
- Schedule: Select the schedule to run a backup job.
- Selection mode: Select whether to back up all or specific VMs. You can choose specific VMs at the bottom of this window.
- Notification mode: Select the method to send notifications.
- Send email: Select when to send a notification email about the results of the Proxmox backup job (always or on failure only).
- Send email to: Define the recipient’s email address.
- Compression: Select a compression level (none, LZO, GZIP, or ZSTD).
- Mode: Select a VM backup mode (Suspend, Snapshot, or Stop).
- The Enable checkbox is used to enable or disable a scheduled Proxmox VM backup job.

General backup schedule settings
- At the Retention tab, you can configure how long backups are stored. You can choose the number of hourly, daily, weekly, monthly, and yearly backups to keep.
- Click OK to save settings.

Backup retention settings
You can also select a VM backup job in the list of scheduled backup jobs and click Run Now if you don’t want to wait for the scheduled time.

Selecting and running a scheduled backup job
Troubleshooting Proxmox Backups and Restores
Sometimes, issues may occur when backing up virtual machines or restoring them from Proxmox backups. Consider the following steps to resolve these issues:
- Check whether you have enough disk space to store backups.
- Check the permissions of the destination directory.
- If a Proxmox VM backup fails in snapshot mode, try shutting down the VM and running a backup in stop mode. The guest operating system may not support snapshot mode for hot backup on a local disk.
- Check the VM configuration if VM restore errors occur.
- If storage doesn’t support the current VM (virtual disk) format, try using another storage.
- If backing up takes too long, check the network bandwidth, the virtual disk size, and disk health. Schedule backups during non-working hours when CPU, network, and storage loads are lower.
Choosing the Right Backup Strategy for Your Proxmox Environment
The optimal strategy for Proxmox VM backup in your environment should be secure, reliable, and well-tested. Below are the recommended practices for VM backup.
- Perform VM backups regularly using scheduling and automation.
- Keep backup storage well-protected and allow only authorized users to access backups. Backups can be a target of ransomware, so safeguard them to ensure a successful recovery.
- Configure retention settings to keep the latest backups and some older ones. You can mention that some data was changed, corrupted, or deleted after that modification event. Having older backups allows you to restore the needed data. Follow the Grandfather-Father-Son retention policy for optimal storage use.
- Test backups regularly. If backups are not tested, there is no guarantee they will be successfully restored after a data loss event. Backup testing improves the Proxmox VM backup strategy and makes it more resilient.
- Store multiple backup copies in different locations. If one of the backup copies is lost or corrupted, you can restore data using another. Follow the 3-2-1 backup rule: have at least three copies of data, two of which are stored on different storage and one stored offsite.
As an alternative to the native Proxmox VM backup functionality, you can use NAKIVO Backup & Replication since it supports Proxmox agentless backup. The NAKIVO solution also supports incremental backup of Proxmox VMs, wide automation settings, encryption, and backup immutability. You can choose one of the multiple backup locations, including Proxmox VE backup to NAS.
Final Thoughts on Proxmox Backups
VM backups can be configured in the native Proxmox VE web interface. You can manually run backup jobs for specific virtual machines or schedule backup jobs with retention settings. Backups are essential for any data protection strategy. Perform Proxmox backups regularly, conduct recovery testing, and protect backups from ransomware and unauthorized access.


Powered By

Linux Security - Your source for Top Linux News, Advisories, HOWTOs and Feature Releases
QUICK LINKS
subscribe to newsletters!
Like staying secure? So do we.
Sign up for updates, tips, and alerts!